
AI Art Generators and How They Fuel Your Creativity
- Author Bruce Shields
- Feb 2, 2023
- 6 min read
After using multiple A.I. Art generator websites and creating hundreds of works, I have created this blog to share what I have learned about AI Generators and how they can fuel your creativity!
I created this first set of AI-Generated images for my post-apocalyptic series on Kindle Vella, LIFE AFTER THE APOCALYPSE: THE PANDEMIC DAWN CHRONICLES


The way that the A.I. Art Generator works is simple but not easy. It varies on different websites, but the concept is the same. Type a description of what you want the A.I. to create, and it will do its best to create an image it believes you are describing.
Some of the A.I. Generators, such as Craiyon (formally DALL-E Mini), are not as advanced as others, and your results will be pleasantly haunting if that is what you are looking for in images. For example, Craiyon A.I. cannot correctly define facial features, which causes them all to be grotesquely distorted and blurry, with either too many or not enough parts. It also contorts human bodies into unnatural positions and adds random limbs and other oddly satisfying oddities.
The images appear almost dream-like and very interesting to look at; however, since I am not a horror author, this website did not suit my purposes.
I tried the infamous ChatGPT before they were such a media hit, but since the popularity, I can no longer log in because they are always "too busy" and suggest I try later. So after days of no success, I moved on.
I eventually stumbled onto NightCafe, which I genuinely love. It takes time to get used to, but with some practice and the free daily credits you get for performing menial tasks, you can create some unique images.
I created the ones above to use in the online Kindle Vella serials I write. These, and many more like them, are all located in my "Apocalypse" folder.
Images for ALL Occasions: The Baron
I also created a slew of characters for another Kindle Vella Series I author, Baron Von Munchausen and the Clockower of Time.
I am very particular about how the characters appear because I write them before creating their images with A.I. There is a lot of trial and error and discarded ideas before I finally get the right one.
As you can see in the following Gallery, the characters appear to live in either the 18th or 19th century (I have not divulged an actual date yet.), and they have a "steampunk-ish" feel to them.


It is a lot of fun seeing the things you can create and trying to re-word your descriptions so that you get "usable" images. I will talk later about how to phrase things for the best results, which is the hardest thing to learn.
I used the same descriptions for most of these images and created multiple pictures simultaneously using randomly generated "seeds" to keep the results different.
The incredible thing about A.I. generation, primarily since they use random seeds and so many settings and text descriptions, is that it is impossible to create the same image twice. At least, I do not believe you can. I have looked at hundreds of pictures and made hundreds myself, and the only time there were somewhat similar images was when I purposefully used a "starting image" to create the others.
They were similar but still so different! I created sixteen images using one starter image, and it appeared as sixteen other people wearing the same name-brand clothing, though their clothes were different.
I no longer use a starting image unless I am looking for a specific pose.
Another Day, Another 5-Free Credits: Willow Creek
The third (and last, for now) Kindle Vella series I write is WILLOW CREEK.


It becomes very interesting when you get genre specific. Some of the "old west" images I created contain "artifacts" which do not belong. Again, Steampunk-ish jewelry or gears on their clothes.
I overlooked some of them because the images came out so well. But it can get complicated if you try creating an image for a book cover. For example, if you are writing historical fiction taking place in 1886, the last thing you want is some Steampunk item on their clothing.
With many trials and errors and crazy results, you can eventually have a nice collection.
Teach Me: OK, Grasshopper.
Firstly, there is a lot to it! So, let us skip some steps, such as creating an account and obtaining credits for creating images. I will speak specifically about the NighCafe website, but I am sure these techniques would work on other "text to image" A.I. platforms. I cannot remember if they give you credits to start with, but I do know they give you five each day just for logging in, and you can do things to earn more or break down and buy some.
At the time of this blog, they have monthly plans from $9.99 up to $79.99. I am too frugal for that noise, so I considered earning credits. I had to follow others, like some things, vote on daily challenges, etc. You can also buy credits from $7.99 to $299.99. These packs give you 100 to 10,000 credits. You can also earn badges, which come with credit rewards. With this part out of the way, I will walk you through your first creation!
Step-by-Step: Creating Your First A.I. Generated Image
1. LOGIN TO YOUR ACCOUNT
Either login to your account or create one. It is free.
2. CLICK THE RED "CREATE" BUTTON
This will take you to the NightCafe editor for creating your images.
3. CHOOSE "ADVANCED MODE"
In the top left of your screen, you should see an "Advanced Mode" switch. Turn it green.
4. CHOOSE AN ALGORITHM
There are a few algorithms you can choose from. Stable, DALL-E 2, Coherent, Artistic, and Style Transfer. Feel free to experiment. However, for this instructional, I will choose Stable. This is the one I use most of the time.
5. CLICK "ADVANCED PROMPT EDITOR"
Ignore the "your text prompt" and click "Advanced Prompt Editor" beneath it.
6. ENTER "YOUR TEXT PROMPT"
Now, this is where it gets tricky and takes a lot of trial and error with experimentation. First, I will explain the format it uses, then tell you exactly what to type. Afterword, you can see how your images measure up to the ones I created using the same prompts and settings.
Good writing prompts are the secret to great images. Firstly, you want to type in your main subject. Let's say, "A beautiful cabin in the woods." Then your secondary subject, "Wild horses in the distance." Add an artist's name and style prompts, like "by Thomas Kinkade." Then add the photography prompts, "8k resolution, a masterpiece, 35mm, hyperrealistic, hyper maximalist."
If you need suggestions, click "Browse Modifiers" under the prompt.
Your Prompt 1 should look like this, "A beautiful cabin in the woods. Wild Horses in the distance. By Thomas Kinkade, 8k resolution, a masterpiece, 35mm, hyperrealistic, hyper maximalist."
7. CLICK "ADD ANOTHER PROMPT"
Now we want to add a "negative prompt," which will tell the A.I. all the things we do not want in the image.
8. ENTER "YOUR SECOND TEXT PROMPT"
It should look like this, "amateur, bad, anatomy, blurred, blurry, border, cut off, deformed, disfigured, extra limbs, poorly drawn face, ugly, watermark, signature."
Again, you can look at modifiers or other people's images if you need suggestions. Some artists hide their prompts, though. They have discovered the secret to awesome images and do not want to share.
9. ADJUST THE WEIGHT OF EACH
Prompt 1 should be a weight of 1.0, and Prompt 2 (your negative prompt) should be -0.3
You can add quite a few prompts and adjust them accordingly. This is where things get really crazy and random. You can now choose a "Start Image" if you wish, but I don't.
10. SETTINGS
For simplicity and comparing our images for fun, in settings, choose 1 Image, which will cost you 0.5 credits. I always choose Thumbnail next. If you get a really nice image, you can spend credits to enlarge it later. I choose short runtime. I like Portrait 3:4. I always leave random seed on. I choose NONE for CLIP Guidance.
If you choose to go to All Settings, I leave the overall prompt weight at 50% and do not touch anything else.
11. CREATE
Now click that "CREATE" button and see what you get! Here is my creation.
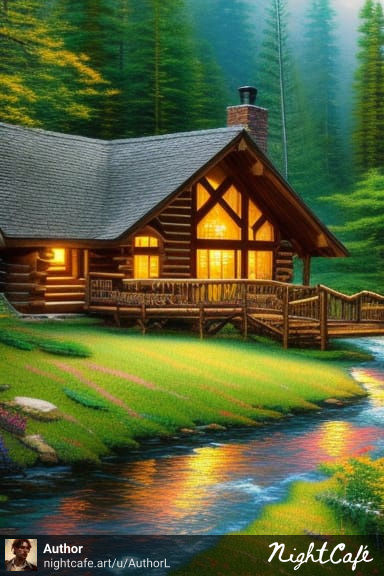
It is a little underwhelming considering all they can do. But they got the style anyway.
Post your creations in the comments. I would love to see what you came up with using the same settings!
I generally use this specifically for chreating characters for my writing. It helps me to visualize with the pictures of my characters when I write. Also, it is fun to know that your character is not only unique in your stories, but the image as well!
I look forward to seeing your crazy creations! Happy Creating!


Comments